News and Views, Volume 54 | Analysis of Ultrasonic Pipe Cleaning and Viability for Use in Nuclear Power Plants

By:  Ashkan Nejad, Ph.D.

Ultrasonic cleaning is a non-destructive, low-cost technological method that uses high-frequency waves to remove contaminants from materials. The process utilizes specialized ultrasonic devices equipped with transducers that emit longitudinal and flexural waves at frequencies ranging from 15 kHz to 25 kHz to dislodge contaminants and carry them away with a cleaning solution. Cleaning pipes using this method, in accordance with regulation and safety standards, would safely and effectively reduce maintenance costs while ensuring optimal pipe functionality. When applied in the nuclear industry, this technique also allows for reduced contamination and radiation dose.

Structural Integrity has performed a study and multi-faceted analysis of this technique and its effect on pipe stresses caused by the induced vibrations to determine the feasibility of using ultrasonic vibration waveforms to clean internal piping in nuclear power plants.

FORCED FLEXURAL VIBRATION IN PIPES
The field of piping dynamics focuses on analyzing the stress caused by vibrations in pipes. This involves the use of established beam theories, such as Rayleigh and enhanced Timoshenko beam theories, which have been extensively studied. These theories are used to create piping dynamics models that assess the free vibration and bending stress within the pipe. However, in cases of forced vibration, the stress distribution on the pipe’s thickness due to external forces extends into three dimensions, while advanced beam theories can only model the flexural stress distribution in two dimensions. Although these theories are useful in analyzing pipe vibration responses in low-frequency vibration modes, they are inadequate for steady-state high-frequency harmonic loads on the pipe.

Experimental dynamic stress analysis is expensive and faces challenges when dealing with high-frequency flexural wavelength and instrumentation dimensions. Additionally, variations in pipe diameter and controlling voltage can significantly alter the dynamics of the ultrasonic resonator and pipe dimensions.

Despite these challenges, recent advancements in computational techniques and high-speed computers have made modeling elastic flexural wave propagation in piping systems more attainable. Accordingly, this study employs linear dynamics finite element (FE) analysis to simulate the flexural stress wave propagation in two ultrasonic resonator devices attached to a stainless-steel pipe. The subsequent extraction of three-dimensional stress and linearization stress distribution facilitates the evaluation of peak and bending stress as alternating stress. This analysis is then compared with the endurance limit, establishing a framework for qualifying the utilization of ultrasonic cleaning devices in nuclear plant piping systems.

STRESS LINEARIZATION
The Stress Linearization tool in the ANSYS program is used to separate stresses within a section into constant (membrane), linear (bending), and peak components. This option works by using a path defined by two nodes that traverse the thickness of the pipe cross-section. The path includes two endpoints, the coordinates of the cross-section (nodes), and 47 intermediate points automatically determined through linear interpolation in the active display coordinate system. Both start and end nodes are typically assumed to be located at free surfaces with the highest local equivalent stress intensity.

Figure 1. linearized stress distributions throughout the pipe thickness.

To calculate the membrane values of the stress components, an averaging integral is used across the thickness, with the centerline situated at the midpoint of the pipe thickness. Figure 1 shows the linearized stress distributions throughout the thickness, with the center of thickness as the coordinate center. The normalized bending stress can be compared with the allowable stress endurance defined in ASME OM3, but only for low-frequency modes where the bending stress is the dominant alternating stress. However, in high-frequency forced vibration, the stress distribution caused by shell-mode flexural waves through the thickness and longitudinal directions is approximately three-dimensional around the external force locations and two-dimensional far from the applied force location. This can make the peak alternating stress higher than the bending stress. Therefore, for comparison with allowable stress, peak stress should be considered as a conservative method. This approach ensures a comprehensive assessment of stress distribution and facilitates a nuanced analysis of constant and linear stress components within the specified section.

FORCED HARMONIC EXCITATION AND RESPONSE
When the ultrasonic resonator has voltage applied, with a frequency sweep from 21 to 22.5 kHz, this results in the harmonic displacement of the piezoelectric disks. The displacement then travels through the contacts between the ultrasonic cleaning component and the pipe. To analyze the equation of motion, the Harmonic Full Method is used. The Full Method involves solving a system of simultaneous equations directly using a Sparse matrix solver designed for complex arithmetic, Equation (1). This static complex form is derived from the forced equation of motion shown in Equation (2). The I and R subscripts in Equation (2) show the real and imaginary components of the complex vectors. The method accommodates various loads and boundary conditions. It also incorporates the effects of inertia and damping components to obtain the forced vibration displacement response. A conservative damping coefficient of 0.5% is used to simulate energy dissipation in the material through hysteretic damping. The calculated displacement is

The stress intensity is calculated, which is twice that of Shear Tresca. Afterward, it is linearized and compared with the allowable stress limitations. This methodology accurately assesses the resonator’s dynamic response and its implications on stress levels. It provides conservative insights into the structural performance under harmonic excitation.

SI’s RESULTS
SI conducted studies and analyses to find the benefits of using ultrasonic vibration waveforms to clean internal piping in nuclear power plants to enhance flow dynamics and reduce radiation exposure. The ASME Code for Operation and Maintenance of Nuclear Power Plants was followed to monitor pipe vibrations, and computational tools such as finite element analysis were utilized to assess piping responses to dynamic loads induced by ultrasonic transducers.

Figure 2. Displacement Harmonic response of pipe under high-frequency transducer loading through the Couplers.

Based on our findings, SI proposes a new approach that utilizes linearized stress intensity derived from finite element linear dynamics analysis tools. This approach offers a more conservative estimate of allowable alternating peak stress values compared to relying solely on bending stresses. This method addresses the limitations of linearized alternating bending stress in accurately calculating stress under high-frequency harmonic loads, where shear waves and shell modes are induced.

Our research confirms the efficacy of linearized peak stress as a superior metric for evaluating stress-induced fatigue in high-frequency ultrasonic cleaning applications.


Get News & Views, Volume 54

News and Views, Volume 54 | Monticello Nuclear Generating Plant – BioShield Evaluation

By:  Livia Costa-Mello, Shari Day, and Dan Denis

Figure 1. Example of RPV and Bioshield showing areas of interest for evaluation.

Background
Many U.S. nuclear plants are completing license renewal (LR) activities to extend their operating life.  The initial LR application extends operating licenses from 40 to 60 years; the subsequent renewal (SLR) further extends this from 60 to 80 years.  As part of the LR/SLR application process, utilities must demonstrate that they have accounted for a variety of potential aging mechanisms that may take place over the ensuing operating period.  One such mechanism is the loss of strength and/or ductility due to long-term exposure to high levels of radiation.  This includes the reactor pressure vessel (RPV) and primary system piping but also extends to support structures (steel/concrete) in the vicinity of the RPV.

Xcel Energy submitted their SLR application for the Monticello Nuclear Generating Plant in January 2023.  Constructed in the 1960s, Monticello is the oldest operating boiling water reactor (BWR) in the U.S. fleet and will reach 60 years of operation in 2030.  As part of the Nuclear Regulatory Commission’s (NRC’s) standard review plan (SRP) for SLR applications1, detailed evaluations are recommended for steel and concrete structures which are predicted to exceed certain established thresholds of irradiation dose.  This includes the biological shield wall (also referred to as the “bioshield” or “sacrificial shield”), a large concrete and steel structure that surrounds the RPV  whose primary purpose is to shield workers and equipment from high levels of neutron and gamma radiation.  In addition, the bioshield provides support for other critical components.

Xcel contracted SI to perform an evaluation of the Monticello bioshield in support of its SLR application.  Initially, SI assessed embrittlement of the concrete and steel in accordance with the methodology in NUREG-15092 .  Following questions posed by the NRC reviewers, additional clarifications were requested regarding plant-specific materials, justification of gamma heating parameters, and inclusion of weld residual stresses.  SI performed separate heat transfer and fracture mechanics analyses to address these inquiries.  This article summarizes the approach and results of this first-of-a-kind evaluation.

Figure 2. Typical Reduction in concrete strength due to irradiation.

Assessment of Bioshield Concrete Structure
As illustrated in figure 1, the portion of the shield wall that is critical for support purposes is near the bottom of the RPV, well below the active core.  However, in accordance with the SRP, the concrete within this region is evaluated for irradiation-induced capacity reductions in accordance with methodology outlined within related EPRI reports.  Both neutron and gamma dose were evaluated in accordance with NUREG-2192 guidelines, along with expected operating temperatures experienced by the concrete.

Radiation exposure levels for the Monticello bioshield at the end of the SLR operating period were computed via separate third-party analysis.  The computed neutron fluence was less than the threshold for potential concrete damage, rendering it unnecessary to evaluate this item, but the computed gamma dose exceeded the potential damage threshold.  Therefore, SI performed a detailed study to extrapolate the gamma exposure and any associated loss of strength for the load-bearing portion of the bioshield wall.  The evaluation compared published lower-bound strength values from literary sources to the fluence values obtained from which a conservative factor on reduction in structural capacity was determined.

SI performed a detailed set of structural calculations to benchmark the original design basis analysis against the pertinent code of construction, ACI 318-63.  These calculations were repeated for the predicted reduction in strength, and for all locations the predicted loads (or “demand”) were less than the available capacity.  Thus, the structural portion of the bioshield wall was assessed to be acceptable for extended operation through the SLR period.

Figure 3. Dpa Variation as a function of Distance from Core Mid-Plane, Adjusted to Bounding Dpa for Shield Wall

Assessment of Bioshield Steel Liner
SI performed an assessment of the steel liner plates on either side of the bioshield wall, in accordance with NUREG-1509.  The evaluation began with identifying the region of the bioshield subject to the highest radiation exposure.  Comparing the elevation of the active core to the predicted distribution of neutron irradiation, the region of interest was determined to be ±100 inches above/below the core centerline.  In this region, the only structural steel elements are the WF27x177 columns and the 1-¾” and ¼” thick liner plates.

For the indicated region, the effect of irradiation on the shift in ductile to brittle fracture transition temperature (known as “nil ductility temperature” or NDT) was evaluated.  An NDT shift is calculated by referencing the irradiation at various elevations against criteria from NUREG-1509; this value is added to the initial NDT to compute an adjusted NDT.

ANSYS was used to develop a finite element model of key structural members for subsequent analyses.  To benchmark the original design basis analysis, the model was initially developed using only the columns, girders, and stabilizers, after which all design basis loads were applied.  However, the results from this model were observed to exhibit significant displacement of the steel columns due to weak axis bending.  Therefore, SI developed an enhanced model for the key embrittled region to include the liner plates.  The maximum principal stresses from this enhanced model were demonstrated to be less than the 6 ksi operational stress limit in NUREG-1509.  Therefore, the steel portion of the Monticello bioshield was determined to remain structurally sound for the period of SLR extended operation.

Figure 4. Frame Model of Shield Wall Space Frame

Upon initial NRC review of the concrete and structural evaluations, additional questions were raised regarding NRC desired modifications to the NUREG-1509 methodology for extended SLR operation.  The primary focus of these questions related to conservatism of the analyses when accounting for Monticello-specific properties, such as gamma heating of the concrete and impacts of weld residual stresses.  Accordingly, SI developed a plant-specific heat transfer evaluation, and used those results to perform a fracture mechanics analysis of the stress state in the limiting beltline region.

Bioshield Heat Transfer Analysis
During NRC review of the steel and concrete analyses described in the prior sections, questions were raised regarding the potential for additional degradation of the concrete due to extended exposure to high temperatures and gamma-induced heating.  To address these questions, SI developed a heat transfer model of the bioshield, accounting for RPV insulation, the annular air gap, and conduction through both liner plates and the concrete.  Calculations were performed both by hand and using an axisymmetric model within Abaqus.

Figure 5. Detailed stress analysis results for critical region of bioshield.

The maximum temperature within the concrete portion of the bioshield was calculated to be below a 150 °F threshold value from the American Concrete Institute (ACI) for nuclear safety-related structures.  The added temperature due to gamma radiation heating was estimated as less than 1.5 °F. Therefore, the bioshield was determined to be acceptable for long-term thermal exposure.  The temperatures during operation do induce additional thermal expansion stresses in the hoop direction on the outer liner.  Using the heat transfer model and application coefficients of expansion, these stresses were estimated to be less than 1 ksi, which are judged to be minimal given that primary loads on these members are in the bioshield-axial direction.  Based on these results, there is no concern for thermally induced damage of the Monticello bioshield over the course of the SLR extended operating period.

Bioshield Fracture Mechanics Evaluation
NUREG-1509 includes an evaluation of a postulated flaw in structural steel members, in accordance with the fracture toughness approach in ASME Code, Section XI, Appendix G.  For Monticello, the bioshield is constructed of ASME A36 steel, which was considered for computation of the NDT temperature, resulting in an allowable fracture toughness based on the ASME code. However, when considering industry literature and prior SLR evaluations, this value was conservatively reduced for the Monticello Evaluation. The fracture mechanics evaluation from NUREG-1509 was reproduced, using inputs from the steel liner FEA and bioshield heat transfer analysis.  The resulting analysis demonstrated sufficient margin between the applied stress intensity and conservative allowable fracture toughness, confirming that the Monticello bioshield would remain intact with no potential for brittle fracture even in the event of a postulated flaw.

Figure 6. Simplified heat transfer model for bioshield.

Conclusions
SI completed a first-of-a-kind evaluation of the Monticello bioshield, assessing long-term adequacy of the structural steel and concrete with exposure to irradiation and thermal effects.  The analysis introduced reasonable inputs in place of overly conservative assumptions and considered multiple potential aging mechanisms in order to comprehensively assess future conditions.  The results of the evaluation were accepted by the NRC, demonstrating a success path to perform similar evaluations for other sites pursuing LR/SLR.  These analyses are unique on a case-by-case basis, as each plant’s design, construction, and operational history will result in different regions and/or components being included in the evaluation.


References

  1. U.S. NRC Report NUREG-2192, “Standard Review Plan for Review of Subsequent License Renewal Applications for Nuclear Power Plants,” July 2017.
  2. U.S. NRC Report NUREG-1509, “Radiation Effects on Reactor Pressure Vessel Supports,” May 1996.


Get News & Views, Volume 54

News and Views, Volume 55 | UPDATE: Encoded Phased Array Ultrasonic Examination Services for Cast Austenitic Stainless Steel (CASS) Piping Welds in Pressurized Water Reactor (PWR) Coolant Systems

By:  John Hayden and Jason Van Velsor

Our initial article on this topic in News & Views, Volume 531 describes the challenges imposed by cast austenitic stainless steel (CASS) materials and the development of our CASS UT Examination solution. At the time of the prior article’s publication, SI was also conducting examinations of numerous CASS piping specimens. This article provides details of both that performance demonstration and the results of those examinations.

TYPICAL CASS PIPING WELD LOCATIONS IN PWR REACTOR COOLANT SYSTEMS
Figure 1 illustrates the presence of CASS piping components, both statically and centrifugally cast, in the primary Reactor Coolant Systems of many U.S. PWR plants. Other PWR plant designs also contain CASS components, albeit in fewer locations and only in the form of short spool piece segments, usually for reactor coolant pumps and safety injection system safe ends.

Figure 1. Locations of CASS piping components, both statically and centrifugally cast, in primary Reactor Coolant Systems of many U.S. PWR plants

REGULATORY BASIS FOR CASS EXAMINATION CAPABILITY
ASME Section XI Code Case N-824, which was approved by the NRC in 2019, provides specific direction and requirements for ultrasonic examination of welds joining CASS components. N-824 was incorporated into Section, XI, Appendix II, Supplement 2 in the 2015 Code edition. The NRC has stated (10CFR50.55a, 07/18/2017) that with use of the aforementioned N-824 methodology “Licensees will be able to take full credit for completion of the § 50.55a required in-service volumetric inspection of welds involving CASS components.” SI’s procedure development and demonstration were therefore based on these requirements.

ULTRASONIC TECHNIQUE PERFORMANCE DEMONSTRATION
Though not required by the ASME Code, SI conducted a performance demonstration of our CASS UT system at our facility in Huntersville, NC. Using CASS piping system specimens on loan from the EPRI NDE Center, SI successfully validated our ultrasonic examination system capabilities as follows.

Ultrasonic Procedure – SI’s CASS ultrasonic examination procedure is fully compliant with ASME Section XI Code documents, and NRC-imposed technical approval conditions. The procedure has also been optimized with many insights gained from our laboratory experiences while examining EPRI-owned CASS piping specimens.

Ultrasonic Equipment – The ultrasonic system components required by Code have been designed and fabricated by SI or purchased, including the following:

  • Ultrasonic instrumentation capable of functioning over the entire prescribed ranges of examination frequencies. The standard examination frequency range extends from low-frequency, 500 KHz operation for CASS pipe welds > 1.6” Tnom and 1.0 MHz for CASS pipe welds ≤ 1.6” Tnom
  • Transducer arrays were employed to meet the physical requirements of frequency and aperture size capable of generating the Code-prescribed wave mode, examination angles, and focal properties.
  • An assortment of wedge assemblies were designed and fabricated then mated with transducer arrays to provide effective sound field coupling to the CASS components being examined.

Data encoding options necessary to acquire ultrasonic data given the expected range of component access and surface conditions are available. The encoding options include:

  • A fully-automated scanning system capable of driving the relatively large and heavy 500KHz phased array probes. This system was used during our laboratory examinations of CASS piping specimens.
  • A manually driven encoding system — a proven, field-worthy tool — which may be employed in locations where fully automated systems cannot be used because of access restrictions.

Examination Personnel – The challenges that exist with the examination of CASS piping welds warrant a comprehensive program of specialized, mandatory training for personnel involved with CASS examinations. This training includes descriptions of coarse grain structures, their effect on the ultrasonic field, the expected ultrasonic response characteristics of metallurgical and flaw reflectors, and the evaluation of CASS component surface conditions.

Additionally, SI’s ultrasonic examination personnel are thoroughly trained and experienced in all elements of encoded phased array ultrasonic data acquisition and analysis in nuclear plants and hold multiple PDI qualifications in both manual and encoded phased array DM weld techniques.

EPRI CASS PIPING SPECIMENS
The EPRI CASS pipe specimens, their outside diameter (OD) and thickness dimensions, and butt weld configurations examined by SI are described below.

12.75″ OD, 1.35″ Tnom SPECIMENS
Three pipe-to-pipe specimens representative of piping found in pressurizer surge and safety injection applications were examined. Each of these specimens had the weld crown ground flush.

Figure 2. Schematic of 12.75” OD, 1.35” Tnom CASS specimens.

Figure 3, Figure 4, and Figure 5 present examples of ultrasonic data images of a flaw detected in a 12.75” OD pipe-to-pipe tapered specimen.

Figure 3. Representative ultrasonic C-Scan data image from 12.75” OD, 1.35” Tnom specimen.

The C-Scan is a 2-D view of ultrasonic data displayed as a top (or plan) view of the specimen. The horizontal axis is along the pipe circumference, and the vertical axis is along the pipe axis or length.

Figure 4. Representative ultrasonic B-Scan data image from 12.75” OD, 1.35” Tnom specimen.

The B-Scan is a 2-D view of ultrasonic data displayed as a side view of the specimen. The angular projection of the data is displayed along the examination angle. The horizontal axis is along the pipe axis, and the vertical axis is along the pipe thickness.

Figure 5. Representative ultrasonic D-Scan data image from 12.75” OD, 1.35” Tnom specimen.

The D-Scan is a 2-D view of ultrasonic data displayed as an end view of the specimen. The horizontal axis represents the pipe circumference, and the vertical axis is along the pipe thickness.

28″ OD, 2.0″ Tnom SPECIMENS
Four pipe-to-pipe specimens representative of piping found in reactor coolant loops were examined. Each of these specimens had the weld crown intact and left in place.

Figure 6. Schematic of 28” OD, 2.0” Tnom CASS specimens.

Figure 7, Figure 8, and Figure 9 present examples of ultrasonic data images of a flaw detected in a 28” OD pipe-to-pipe tapered specimen.

Figure 7. Representative ultrasonic C-Scan data image from 28” OD, 2.0” Tnom specimen.

The C-Scan is a 2-D view of ultrasonic data displayed as a top (or plan) view of the specimen. The horizontal axis is along the pipe circumference, and the vertical axis is along the pipe axis or length.

Note the ability of our UT data acquisition equipment and data analysis techniques to resolve, discriminate, and identify inside surface geometric conditions (weld root and pipe counterbore), along with detecting and sizing the flaw indication. Also, note the excellent signal-to-noise ratio achieved.

Figure 8. Representative ultrasonic B-Scan data image from 28” OD, 2.0” Tnom specimen.

The B-Scan is a 2-D view of ultrasonic data displayed as a side view of the specimen. The angular projection of the data is displayed along the examination angle. The horizontal axis is along the pipe axis or length. The vertical axis is along the pipe thickness.

Figure 9. Representative ultrasonic D-Scan data image from 28” OD, 2.0” Tnom specimen.

The D-Scan is a 2-D view of ultrasonic data displayed as an end view of the specimen. The horizontal axis is along the pipe circumference, and the vertical axis is along the pipe thickness.

28″ to 29″ OD, 2.0″ to 2.5″ Tnom TAPERED WELD SPECIMENS
Four pipe-to-pipe specimens, with tapered weld surfaces representative of piping found in reactor coolant loops were examined.

Figure 10. Schematic of 28” to 29” OD, 2.0” to 2.5” Tnom CASS specimens.

Figures 11, 12, and 13 present examples of ultrasonic data images of a flaw detected in a 28” OD to 29” OD pipe-to-pipe tapered specimen.

Figure 11. Representative ultrasonic C-Scan of a 28” to 29” OD, 2.0” to 2.5” Tnom pipe-to-pipe, with tapered weld surfaces.

The C-Scan is a 2-D view of ultrasonic data displayed as a top (or plan) view of the specimen. The horizontal axis is along the pipe circumference, and the vertical axis is along the pipe axis, or length.

Figure 12. Representative ultrasonic B-Scan of a 28” to 29” OD, 2.0” to 2.5” Tnom pipe-to-pipe, with tapered weld surfaces.

The B-Scan is a 2-D view of ultrasonic data displayed as a side view of the specimen. The angular projection of the data is displayed along the examination angle. The horizontal axis is along the pipe axis or length. The vertical axis is along the pipe thickness.

Figure 13. Representative ultrasonic D-Scan of a 28” to 29” OD, 2.0” to 2.5” Tnom pipe-to-pipe, with tapered weld surfaces.

The D-Scan is a 2-D view of ultrasonic data displayed as an end view of the specimen. The horizontal axis is along the pipe circumference, and the vertical axis is along the pipe thickness.

SUMMARY OF DATA ANALYSIS RESULTS
Documentation was provided for each EPRI specimen, which contains flaw location, length, and through-wall size to permit the comparison of UT data acquisition and analysis processes to actual flaw conditions.

All of the 23 circumferential flaws in the eleven EPRI specimens were detected. The ultrasonic examination and data analysis techniques achieved flaw location and length sizing RMS errors, which are within acceptance standards of the following ASME Section XI, Appendix VIII Qualification Supplements:

  • Supplement 2, Qualification Requirements for Wrought Austenitic Stainless Steel Piping
  • Supplement 10, Qualification Requirements for Dissimilar Metal Piping

Excellent signal-to-noise ratios were observed for all detected flaws.

For all flaws, the measured length achieved sizing RMS errors within the acceptance standards of the above Appendix VIII supplements.

For specimens with welds ground flush and for all specimens with sufficient access to interrogate the entire through-wall extent of flaws, SI’s technique achieved through-wall sizing RMS errors within the acceptance standards of the above Appendix VIII supplements.

To be clear, the examination of the EPRI CASS specimens does not meet the rigor of Appendix VIII, Supplement 9 qualification because the industry’s (PDI Program) for CASS piping welds is still in preparation. The comparison to Appendix VIII acceptance standards is provided solely as a means to describe the achieved flaw detection and sizing capabilities in CASS material in terms of already established PDI qualifications. Ongoing examination of additional CASS specimens will strengthen already existing ultrasonic examination capabilities and experience.

CONCLUSIONS
The CASS piping welds in many PWR plants provide numerous and complicated challenges to their effective ultrasonic examinations. Most, if not all, CASS RCS piping welds have not been subjected to a meaningful and effective volumetric examination since radiography was conducted during plant construction.  SI’s newly-demonstrated ultrasonic examination procedure for CASS delivers a demonstrated, Code-compliant, meaningful, and effective solution that provides full credit for completion of in-service volumetric inspection per § 50.55a.

References

  1. News and Views, Volume 53, October 2023, “Encoded Phased Array Ultrasonic Examination Services for CASS Piping Welds In PWR Reactor Coolant Systems”
  2. ASME Section XI Code Case N-824, “Ultrasonic Examination of Cast Austenitic Piping Welds from the Outside Surface”
  3. ASME B&PV Code, Section XI, 2015 Edition and later editions

Download PDF

News and Views, Volume 54 | Structural Integrity Supports Pipeline Research Council International’s Hard Spot Project

By Scott Riccardella and Steven Osgood

Structural Integrity is pleased to be working with PRCI to improve ILI performance, provide industry insight regarding prioritizing hard spots, and determine the optimal repair methodologies.

SI’s Pipeline Integrity Compliance Solutions (PICS) group has been implementing a highly strategic project from the Pipeline Research Council International (PRCI) focused on enhancing industry capabilities to detect and assess hard spot anomalies in gas transmission and hazardous liquid pipelines.

PRCI reviewed proposals from several highly qualified firms to support this project. Ultimately, SI was selected to provide support based on a combination of our expertise and integrated proposal, which demonstrated capabilities in field assessment, engineering analysis, and a reputation for providing synchronized follow-up. Being part of this PRCI project reinforces SI’s dedication to helping improve pipeline integrity and assessment practices and further position SI as an expert consulting partner for supporting pipeline operators’ fracture mechanics and in-line inspection (ILI) needs.

About the Project
Hard spots, or localized areas with elevated hardness within the pipe body, were believed to form during manufacturing. Hard spots are prevalent in piping produced by certain manufacturers and/or within certain vintages. They are believed to be attributed to inadequate quality control in the steelmaking, pipe-rolling, and welding processes. Over time, when in specific environmental conditions, cracking can initiate in the hard spots, creating a significant hazard. PRCI issued an RFP focused on evaluating and enhancing ILI tool technology and complementary analytical capabilities to reliably detect, size, and characterize the threat to integrity caused by hard spots.

Project Objective and Details
The project objective is to help the industry better understand ILI performance for more accurate detection and characterization of hard spots, providing targeted feedback, and developing insights to help improve ILI performance and prioritize ILI results.

ILI Performance Evaluation Study
The project’s main task is to evaluate the performance of various ILI technologies and service providers in identifying and characterizing hard spot defects. Testing is performed at the PRCI Technology Development Center (TDC) with pipeline samples (with various hard spot features) removed from service and configured in a test string for pull-through testing from several participating service providers. SI has characterized these samples using advanced NDE methodologies to establish reference data that will be used for determining the probability of detection (POD), probability of identification (POI), sizing accuracy, hardness estimation accuracy, and location accuracy. Individual performance reports will be provided as feedback to the participating ILI service providers to facilitate improving and advancing ILI technologies for hard spot detection and characterization.

Developing the Repair/Response Criteria
Following this testing, SI will complete additional analysis and modeling of the ILI Reported Values versus measured dimensions and hardness values for associated error. SI will also perform modeling to develop statistical correlations (with associated uncertainties) for estimating the Peak Hardness & Hard Spot Length from ILI Reported Values. Data will be analyzed in the context of historical failures and regulatory definitions of a hard spot. SI will develop an assessment methodology to evaluate hard spot criticality with a recommended response criterion (feature prioritization scheme) based on feature severity (length, hardness) and relative safety margin (Predicted Failure Pressure / MAOP).

“This project helps advance a critical initiative for PRCI, helping improve ILI capabilities to address a key threat to pipeline integrity. We are grateful to be partnering with Structural Integrity to develop and deploy this knowledge to our members.”

Jim Wayman Program Manager Integrity and Inspection – PRCI

Evaluation & Recommendation of the Repair Methodology
SI is also working to complete research on different material properties and repair methodologies to determine the suitability of repairs. As part of this task, SI will complete a benchtop study using finite element analysis (FEA) to study the effectiveness of each repair approach (composites and Type A sleeves) leveraging the fitness for service (FFS) methodology detailed in the prior task (Repair/Response Criteria).

Get News & Views, Volume 54

Structural Integrity Associates Acquired by MidOcean Partners

SAN JOSE, CA – August 15, 2024 – SI Solutions today announced their acquisition by MidOcean Partners.  The transaction includes SI Solutions and all its affiliate companies: Structural Integrity Associates, C2C Technical Services, and SC Solutions.  The full press release with additional details follows below.


NEW YORK – August 15, 2024 – MidOcean Partners (“MidOcean”), a premier New York-based alternative asset manager specializing in middle-market private equity, structured capital, and alternative credit investments, today announced the acquisition of SI Solutions (“SI” or the “Company”), a leading provider of engineering, testing, inspection, compliance and maintenance services, digital solutions, and expert consulting for power and critical infrastructure end markets. Terms of the transaction were not disclosed.


With more than 450 employees, SI provides technical expertise and services to enable the reliability and resiliency of the U.S. power markets, safety and regulatory compliance of critical assets, and continued expansion of public and private infrastructure in the U.S. and abroad. The Company will continue to be led by Chief Executive Officer Mark Marano, who previously served as COO of Westinghouse Electrical Company and has deep operating experience in the utility and critical infrastructure markets. In connection with the acquisition, SI’s management team, employee shareholders, and prior investor Jumana Capital have reinvested in the business.

Elias Dokas, Managing Director at MidOcean, said, “SI is a proven industry leader with a stellar track record of serving the power and critical infrastructure markets and delivering superior engineering and specialty services to its clients. The Company has experienced tremendous growth to date and we see numerous opportunities for further growth through organic initiatives and strategic acquisitions, including expanding its service offerings and entering new markets. We look forward to working closely with the SI leadership team to deepen the Company’s relationships with its existing clients and build its market position.”

Brian Finnie, Principal at MidOcean, added, “We are thrilled to be partnering with SI. We believe the combination of SI’s expertise and longstanding client relationships with MidOcean’s utility and infrastructure services experience and dedicated team of operating experts will position the Company for continued growth and success.”

Mr. Marano concluded, “This partnership with MidOcean is the next step in the evolution of the SI Solutions platform, and I’m excited about the future of the company.  We will continue our mission to power the future of critical infrastructure, leveraging our highly skilled employees and our drive for innovation to deliver unparalleled value to our clients.  MidOcean provides us with the additional capabilities and experience to further our mutual goals to serve our industries.”

The acquisition of SI marks MidOcean’s fourth investment in the engineering and critical infrastructure sector. MidOcean previously invested in, and has since successfully exited, System One and The Planet Group. The firm also recently announced a preferred equity investment through its structured capital initiative in GridHawk Holdings, a premier provider of damage prevention services for critical utility infrastructure across the U.S.

MidOcean was represented in the transaction by Gibson, Dunn & Crutcher LLP as legal advisor. Stifel, Nicolaus & Company, Inc. served as exclusive financial advisor to SI. Locke Lord LLP acted as legal advisor to SI and Jumana Capital.


About MidOcean Partners
MidOcean Partners is a premier New York-based alternative asset manager specializing in middle-market private equity, structured capital, and alternative credit investments. Since its inception in 2003, MidOcean Private Equity has targeted investments in high-quality middle-market companies in the consumer and business services sectors. MidOcean Credit Partners was launched in 2009 and currently manages a series of alternative credit strategies, collateralized loan obligations (CLOs), and customized separately managed accounts. For more information, please visit: https://www.midoceanpartners.com/

MidOcean Investor Relations Contact:
Investorrelations@midoceanpartners.com

MidOcean Media:
Amanda Shpiner/Grace Cartwright
Gasthalter & Co.
(212) 257-4170
midocean@gasthalter.com


About SI Solutions
SI Solutions provides technical expertise and services to enable the reliability and resiliency of power markets, safety and regulatory compliance of critical assets, and continued expansion of public and private infrastructure in the U.S. and abroad.  The company is a leading provider of engineering, testing, inspection, compliance and maintenance services, digital solutions, and other consulting and advisement activities. For more information, please visit: https://www.sisolutions.com/

Media Contact:
Christopher Sydor
SI Solutions
704-977-1361
info@sisolutions.com


News and Views, Volume 54 | Combustion Turbine Compressor Hygiene, Part 2

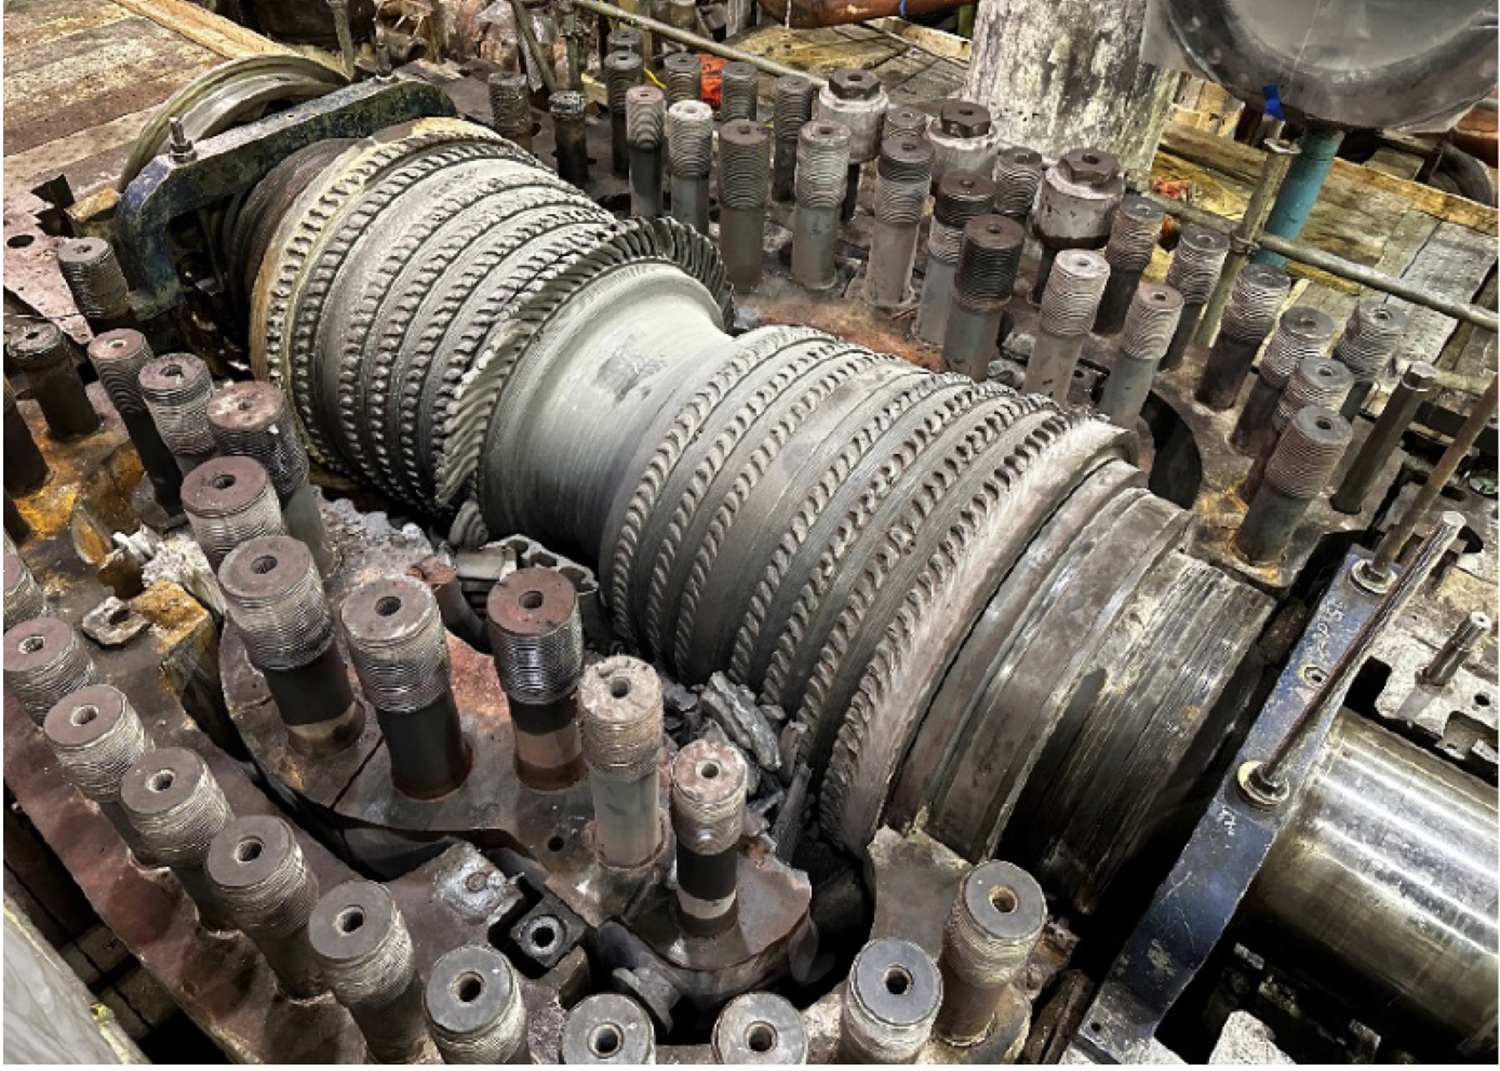
Figure 1. Lower compressor casing after large forward blade liberation, causing a forced outage and catastrophic damage to aft components.

COMPONENT ASSESSMENT AND ANALYSIS

By John Molloy

Structural Integrity (SI) has decades of experience dealing with compressor degradation’s short-term and long-term effects, forced outages, and unforeseen costs regarding Combustion Turbine (CT) compressor hygiene. The inlet package and compressor condition can strongly influence unit performance, efficiency, reliability, risk, and maintenance costs.  Controlling what enters the inlet and mitigating the effects of accumulated foreign material can significantly impact O&M activities and costs.

Additionally, in the new paradigm of cyclical operation and potentially longer downtime between operational periods, additional considerations and actions are incumbent upon O&M to prevent irreversible damage to various CT flow path components (compressor, rotor, etc).

In the 51st edition of News & Views, we discussed the CT compressor hygiene regarding component longevity. This follow-up article will dive into the assessments and analyses.

SI is pleased to offer a comprehensive suite of inspections, analyses, and O&M recommendations to help mitigate these debits to reliable, profitable, and safe operation.

Figure 2. Forward compressor blades with corrosion pitting on the leading edge, platform radius, providing nucleation sites for corrosion fatigue and cracking.

Inlet Package and Forward Compressor Detailed Site Survey

The inlet package and forward compressor site survey is a detailed visual inspection of the inlet filter house/inlet ducting assembly. The inspection allows for documenting potential sources of foreign objects, evidence of sealing issues (floor/wall/roof construction, penetrations, and filter seating), pooling water, corrosion, cracks, cleanliness, and contaminant/debris presence.

The in-depth inspection also examines:

  • Water injection/misting systems for leaks/contaminant accumulation
  • Bearing region and compressor leak entry passages for contaminants/debris
  • Pre-filter deposits/debris collection to determine local environmental loading conditions and corrodents

Figure 3. Pitting on compressor blade.

The SI team additionally collects Inlet Guide Vane (IGV) and forward blade, stator vane, rotor, and carrier deposits/residues to establish the presence of contaminants and or corrodents on the compressor, and compares this to the finding in the pre-filters to establish the efficacy of the filtration system. Particular attention is given to the compressor’s lower half, which is usually the area most affected. Photographic documentation of the typical forward compressor (IGV/R0/S0/R1) pitting conditions is completed using a macro lens (Figure 3). In the final step of the survey, the team performs a mold replication on typical pitting and leading edge (LE) erosion.

Data Collection, Analysis, and Review

Figure 4. Leading edge chloride pitting and fracture on a vane.

During the compressor hygiene testing and analyses, there are several areas where data can be collected. This includes ambient and unit flow path humidity trends, ambient and CT inlet temperature/dewpoint, water injection operation, compressor performance, and an annual borescope inspection.

Other data elements potentially collected or reviewed include water wash frequency, duration, and water wash quality checks consisting of pH and chemistry constituents review of the demineralized water source, water wash solution, and drain. In addition, the IGV calibration report, pollution, contaminant producers, and environmental wind condition survey (drift) can be reviewed if the previous findings merit this effort. Finally, the team correlates the observed pitting locations with known risk profiles for blade/vane excitation. Nodal response stresses can be evaluated for a more detailed assessment.

Laboratory Support

Figure 5. Metallographic cross-section shows leading edge erosion channeling morphology on a forward compressor blade, which facilitates fatigue crack initiation.

SI’s world-class laboratory is leveraged to provide tailored analyses for compressor assessments.

This generally includes:

  • Inlet prefilter contaminant/debris species analysis
  • IGV/R0/S0/R1/Wheel/Case surface contamination species analysis
  • Pitting and/or erosion depth assessment

Blade and vane metallurgical evaluation
When parts are available for analysis, the laboratory analyses can provide specific damage mechanisms affecting the components, which allows for better decisions on mitigation strategies. The goal of the assessment and analysis is to close the loop between the on-site unit findings, the operational assessments, to provde the client with best-in-class combustion turbine availability, and performance.

Get News & Views, Volume 54

News and Views, Volume 54 | Leaks in High Energy Piping Tees

By Kane Riggenbach and Eric Jones

Background

Figure 1. Representative HEP Tee Geometry

The power generation industry has seen an increasing trend of failures and damage detected in high energy piping tee fittings and the associated girth welds in systems made from grade 91 material (and grades 22 and 92). Failures and evidence of significant creep damage have been detected in less than 100,000 operating hours in many cases and as few as 35,000 operating hours. The issues stem from inadequate reinforcement of the branch leg and/or short tee leg lengths, which can result in tee geometries not suitable for high temperature service even though the tee fittings meet design requirements. If inspections reveal that damage has progressed beyond the point where continued operation can be justified through analytical methods with appropriate confidence and risk tolerance, owners may be faced with a choice of expensive temporary repair or long wait for a replacement. The lead time to procure replacements can be twelve months or greater and additional rigorous engineering assessments to determine size specifications may be required because current code requirements are inadequate in some cases.

Issue Overview
Many fabricated tees have failed to withstand short-term exposure to normal operating pressures and temperatures. Analytical assessments have determined that these premature failures can be attributed to a lack of sufficient reinforcement, despite the components in question meeting code design requirements. Additionally, large variations in thickness and diameter and differences in crotch profiles can exist even among similarly sized tee fittings, resulting in uncertainty when trying to extrapolate findings between tees in a system, plant, or fleet. These challenges make it difficult for plant owners to prioritize specific tees for inspection. Experience has shown that there can be significant differences in tee thickness/geometry even among tees produced by the same manufacturer or from one tee crotch to the other. As such, baseline inspections are recommended on all tees operating in the creep regime to comprehensively document their serviceability risk and develop an informed lifecycle management plan.

The applied inspection approach is also adjusted to ensure accurate and reliable detection of damage.

Traditionally, welds have been the most susceptible locations to creep damage in high energy piping systems, so most inspections were solely focused there. For fabricated tee fittings, creep damage has also been detected in the fitting base metal within the crotch region. Localization of creep damage at the crotch region has been validated through finite element analysis based on actual tee geometry. Thus, inspections that were solely focused on girth welds may fail to identify or characterize damage in the tee crotches, providing an incomplete picture of overall condition even for recent inspections.

Damage Initiation
The primary driver of damage in tee geometry is from accumulated creep damage resulting from internal pressure stress. The hole in the pipe for the branch leg of the tee leads to elevated stresses that tend to drive axially oriented cracking in the tee crotch. Also, if the attached piping girth welds are close enough to this elevated stress region, these girth welds are at risk for faster rates of creep damage. As opposed to the axially oriented cracking in the tee base material, girth welds tend to initiate circumferentially oriented cracking due to the orientation of the creep weak weld heat-affected zone (HAZ).

Stresses from piping deadweight and thermal expansion may play a role in biasing damage towards a certain location. However, finite element analyses, ultrasonic inspections of in-service tees, and metallurgical evaluations of cross-sections from ex-service tees have all validated that the distribution of creep damage is consistent with the stress distribution from internal pressure stresses. Figure 2 shows two example ultrasonic phased array scans (left) depicting subsurface indications that are consistent with the creep redistributed FEA stress distribution (right).

Figure 2. Examples of Phased Array Ultrasonic Scans with Indications and Finite Element Color Contour Stress Distribution.

Inspection Considerations
SI has performed numerous inspections of tee fittings and associated girth welds. From those efforts, a series of lessons learned and recommended best practices have been developed:

  • For girth welds, damage can be OD or ID initiated depending on the local geometry and stress state of the component. Damage tends to initiate at the circumferential positions closest to the tee crotches so extra priority should be given toward assessing these areas. The tee side of the weld may include an OD bevel that obstructs UT probe placement on the tee side, but attempts should still be made to scan from both upstream and downstream sides of the weld.
  • For crotch regions, identified damage tends to be ID or subsurface initiated. Additional surface preparation is required in the crotch to permit ultrasonic scanning. Specialized inspection hardware may be necessary to accurately identify and characterize damage because the complex curvature of the OD crotch surface can limit probe contact area (probe bridging) and the thickness of the tee may make it difficult to observe the ID surface. Specially radiused probes or refracted longitudinal probes may be necessary to enable more accurate scanning of the crotch.
  • Extensive thickness mapping is recommended to fully document the as-built geometry of the tee and identify whether any ID stress concentrations may be present from manufacturing of the tee. An example tee grid is depicted in Figure 3.
  • Laser scanning or photogrammetry should be performed to provide the basis for a representative external surface for detailed model creation and finite element analysis on all inspected tees as well as to ensure that the exact location of recorded thicknesses is documented. This scan or set of photographs also provides the basis for a representative external surface for detailed model creation and finite element analysis.   
  • There are multiple documented cases where tees progressed from “No Indications of Service Damage Detected” to macrocracking in far less time than a normally reasonable reinspection interval for girth welds. For this reason, as well as the likelihood that many inspections have been performed without evaluating the tee crotch areas, previously established reinspection intervals may be unreliable, and it is critical for operators with these components to perform an analytical assessment and adjust inspection plans accordingly.

Figure 3. Example of general grid for thickness documentation. Additional thickness mapping should be performed at the crotch regions as well.

Industry Response / EPRI Supplemental Project
The operational challenges associated with premature degradation of high energy piping tees have led to significant industry interest in understanding the factors which combine to result in accelerated damage. The Electric Power Research Institute (EPRI) has initiated a supplemental project focused on studying this issue for tees operating in the creep regime. The project members are comprised of numerous utilities along with service providers (including SI), with a goal of summarizing operating experience and establishing reputable guidance for operators.

One of the early observations from the project is that the quality and consistency of inspection data is critical to problem characterization. There have been multiple instances where lack of pre-planning, inadequate surface preparation, and/or failure to compile adequate data and records have challenged the integrity of inspections. To help improve characterization and increase the accuracy of predictive models, SI is working to standardize NDE inspection techniques utilizing a number of components removed from service.

Recommendations for Utilities/Operators
Based on SI’s experience with tees operating in the creep regime, it is recommended that operators consider the following guidance:

  1. Perform inspection to document the actual fabricated tee geometry, assess material composition, and determine current condition of the tee and associated girth welds. Ensure that the inspection provider can deliver complete and accurate results in a fashion that informs decision making.
  2. Estimate the creep life in accordance with an appropriate analytical assessment method using actual measured tee geometry and operating data. This step necessitates appropriate material correlations for creep strain rate to determine creep redistributed stresses and appropriate creep rupture correlations for calculations to predict time to crack initiation.
  3. If appropriate based on life estimation results, schedule subsequent condition assessments to look for damage at an appropriate point with respect to estimated damage accumulation and risk tolerance.
  4. Consider reviewing and pre-planning mitigation options prior to scheduling inspections.
    • Planning should account for the fact that fitness for service assessments may not result in extensive times to through-wall crack propagation. Stresses in the crotch region have been fairly uniform resulting in short remaining life projections.
    • Planning needs to account for the fact that potentially inadequate tee design requirements are still being addressed by the code committees, and, as such, off-the-shelf replacement tees may also lack reinforcement to ensure appropriate service lifetimes.

Get News & Views, Volume 54

News and Views, Volume 54 | Benefits of High-Performance Computing for the Seismic Analysis of Critical Facilities

By Julio Garcia, PhD, PE

Abstract
Continued advances in the fields of structural and geotechnical engineering and increasing expectations for fidelity and refinement of seismic analysis models have resulted in a computational bottleneck emerging within the structural design activities for critical infrastructure. The Soil-Structure Interaction (SSI) analysis is key to characterize a realistic seismic response. Unfortunately, this is computationally demanding, given the need to characterize both the dynamic response of the structure and the site. The traditional SSI framework, System for Analysis of Soil Structure Interaction (SASSI), is a trusted analysis approach with decades of precedence. Our proprietary SSI analysis software, SC-SASSI, incorporates modern enhanced solution algorithms into SASSI and takes advantage of state-of-the-art computing, thereby drastically reducing analysis run-time.

The expanded SSI capabilities coded in SC-SASSI effectively eliminate the model size limitations of previous SASSI platforms and allow more accurate and streamlined treatment of behavior that have traditionally been neglected or often treated conservatively.

This article provides a variety of recent project examples highlighting how the enhanced solutions algorithms of SC-SASSI coupled with HPC capabilities have been leveraged, resulting in gains such as improved accuracy, reduced uncertainty, and accelerated schedules.

Introduction
Seismic analysis of critical industrial facilities requires the inclusion of the soil into the analysis model to evaluate the influence of the subgrade’s flexibility on the structure’s dynamic behavior. As a result, a soil-structure system is used for this purpose, and the consideration of the soil in the structural behavior is referred to as SSI. Industries other than nuclear also benefit from SSI consideration, both for seismic as well as for other dynamic loading conditions, like machinery vibration. For decades, the SASSI [1] program and its improved derivatives have been an accepted and favored analysis tool for the treatment of seismic SSI effects. With continued advances in the fields of structural and geotechnical engineering, and increasing detail and refinement of analysis models, SASSI has become a computational bottleneck in the design and evaluation of nuclear plant structures, and may not provide the fidelity and detail expected in modern engineering. Compared to the current state of practice for structural finite element (FE) analysis, gross model simplifications are too often perceived to be necessary to ensure reasonable analysis schedules, necessitating numerous assumptions, sensitivity studies, and additional qualitative evaluations to address specific aspects of the real seismic response.

SC-SASSI
Enhanced solution algorithms have become available since the development and widespread adoption of the original SASSI framework in the early 1980s. The commercial code, SC-SASSI [2], leverages these algorithms to efficiently take advantage of modern high-performance computing (HPC) with dramatic results. Figure 1 shows a flowchart highlighting some of the SC-SASSI improvements to the traditional SASSI. The gold boxes represent areas of key improvement and include the all-new RESPONSE module, which provides advanced postprocessing and is also a “living” module that continues to grow and adapt to the user’s needs.

Figure 1. Key SC-SASSI Improvements (Shown in Gold) to Traditional SASSI Modules.

Expanded SASSI capabilities via HPC functionality allow two primary advantages that lead to project gains: (1) large increases in permissible model sizes (often measured as a larger number of “interaction nodes”) and (2) drastically reduced analysis run-time. The large models now possibly allow direct treatment of SSI phenomena that previously required gross simplification and/or compromise. Key advantages of the HPC enhancements for large models are the handling of features like deep embedment, high-frequency hazard, structure-soil-structure interaction, and high-fidelity models for coupled stress analysis and seismic analysis. The example outlined below demonstrates some of the gains achieved using large models.

Figure 2. Example Nuclear Power Facility FE Model with Direct Consideration of SSSI.

Structure-Soil-Structure Interaction (SSSI)
An ideal example to demonstrate SSSI is that of a Nuclear power generating station. Typically, these sites have multiple structures located near one another, each with components critical to the facility’s safe operation.  The SSI behavior of one structure can affect the SSI behavior of an adjacent structure, referred to as structure-soil-structure interaction (SSSI).  Direct consideration of SSSI for multiple large structures has been impractical with traditional SASSI, necessitating the use of 2D “slice” SSSI models or “cascade analysis” techniques. These simplifications seek to reduce the size of the model(s) used to evaluate SSSI effects and/or avoid excessive computer run-times. However, they often insert significant inefficiencies (by way of required benchmarking analysis or decoupled, multi-step analyses) and thus remove realism.   

In contrast, SASSI with HPC provides efficiency to include multiple structures in the same SSI model, thus directly capturing SSSI effects.  In these direct SSSI models, entire multi-building nuclear island complexes have been incorporated into a single analysis run regardless of separation distance, soil properties, foundation depths, etc.  The benefits of direct treatment of SSSI effects include: (a) captures full 3D effects of SSSI behavior on adjacent structures and spatially variable amplitude of SSSI effects; (b) captures two-way feedback between adjacent structures; (c) minimizes the number of separate sensitivity study models to generate and maintain; and (d) allows more streamlined calculation of the relative displacements between adjacent structures.

An example multi-building FE model for direct consideration of SSSI effects in SC-SASSI is illustrated in Figure 2. This pressurized water reactor (PWR) complex [3] combines multiple buildings including the containment building, auxiliary building, radwaste building, turbine building, and intake structure into a single model.  In addition to capturing traditional SSSI effects, the combined model allowed consideration for partially shared load paths between adjacent structures, shared foundations despite separate super-structures, and relative movement between adjacent structures (to directly assess the potential for building impacts and failure of commodities spanning across seismic joints).

Benefits for Short Computational Times
HPC enhancements in SC-SASSI also allow much faster SSI analysis run-times than were possible with traditional SASSI.  The rapid analysis now allows more rigorous treatment of considerations that previously were handled via a sensitivity study or by the enveloping response of bounding cases. Key advantages of the HPC enhancements for shortening the computational times are the handling of features like probabilistic SSI analysis, multiple configurations, and/or alternate boundary conditions (like spent fuel installation facilities that may be analyzed under different cask loading configurations), as well as multiple hazard levels (i.e., design basis and beyond design basis earthquakes). The example outlined below demonstrates gains achieved using rapid analysis.

Probabilistic SSI Analysis
Probabilistic SSI analysis is advantageous over more traditional deterministic methods since it can directly address the inherent uncertainties related to the seismic input motion, soil and structural material behavior, and modeling assumptions. These uncertainties are directly addressed in the probabilistic SSI through randomization of the seismic input motions as well as soil and structural stiffness and damping. However, a drawback in probabilistic SSI analysis is the number of SSI models that are needed to obtain stable and reliable results, and the perceived computational effort associated with analysis of these various models. In practice, at least 30 SSI models are needed using the Latin Hypercube Sampling (LHS) method for the generation of SSI models. For this reason, many structures have traditionally been either analyzed using a deterministic approach or overly simplified for probabilistic analysis to achieve reasonable computational run-time. The use of HPC can mitigate this drawback by significantly reducing the analysis run-time, thus making it feasible to utilize detailed models for probabilistic analysis.

By covering realistic variability of key inputs like soil, structure, and ground motion, probabilistic SSI analyses provide a range of expected structural response results that allow easy identification of either realistic or conservative responses, according to the objective of the evaluation; this represents a significant advantage over deterministic analysis.

The case described below provides an example where probabilistic SSI analyses were used to obtain realistic responses for the purpose of fragility analysis of structures, systems, and components (SSCs) in a nuclear power plant [3]. Each of the 30 probabilistic SSI cases, which included variation of the soil, structural stiffness, damping, and earthquake ground motion, was run for each model. All 30 SSI cases were run in less than one day for each model. These analyses generated 30 In-Structure Response Spectra (ISRS) for each of the selected locations, and the median and 80th percentile spectra were directly extracted. The response spectra variability (βRS), which often must be assumed in fragility calculations, could be directly and accurately calculated for each set of ISRS. Results post-processing is efficiently automated in SC-SASSI. Figure 3 illustrates each resulting ISRS and their post-processing for a typical location.

Figure 3. Example Calculation of Median and 80th% ISRS from Suite of Probabilistic Results.

Ground Motion Incoherence
SC-SASSI offers additional useful features, like ground motion incoherence effects. Ground motion incoherence refers to the spatial variation of the ground motion. In other words, there are differences in the ground motion experienced by two points separated by some distance; the larger the distance, the larger the variability. Considering the effects of ground motion incoherency in SSI analysis enhances the realism of predicted structural response and generally reduces high-frequency response. The relative significance of this refinement depends on several factors, including the foundation input motion’s high-frequency energy content and the foundation footprint’s size. The inclusion of ground motion incoherence in SASSI requires additional computational effort versus coherent ground motion. A common approach in the industry to minimize the additional computational effort is to limit the number of coherency modes in the analysis to some minimum number of modes that can still capture realistic SSI behavior. However, the industry debates on how many modes are sufficient under different conditions. HPC capabilities in SC-SASSI mitigate the computational penalty for maintaining many coherency modes, thus allowing consideration of many modes, even for large and complex structures.

Figure 4. Synchronous Condenser on Pile Foundations and Retrofit Evaluation.

Industrial Facilities on Pile Foundations
Pile foundations are frequently used in industrial facilities. While their static analysis and design are widely understood and applied in practice, the contribution to the dynamic response of piles is often neglected, leading to a mischaracterization of the response, like in the case portrayed below.

At the subject hydroelectric generation facility, the synchronous condenser, responsible for adjusting the electric power before it gets input into the transmission grid, experienced undesirable vibration levels during its initial stages of operation. The source of the high vibration levels is attributed to the resonant dynamic interaction between the condenser, its foundation, and the supporting soil media, which went undetected during the initial design process. The foundation of the condenser consists of a massive reinforced concrete block supported on steel casing piles with reinforced concrete infill.

A detailed three-dimensional finite element SSI model was developed to accurately represent the interaction between forces, structure, soil, and foundation, as displayed in Figure 4a. The model was analyzed using the computer software SC-SASSI, including the recently implemented and validated pile elements. The SSI analysis was able to diagnose the problem, and it also served to evaluate feasible remediation solutions (see Figure 4b). The selection of the retrofit solution was performed with the objectives of (1) reducing vibration amplitudes, (2) shifting the system frequency away from the operation frequency, both (1) and (2) being achieved by increasing the system stiffness and therefore minimizing potential resonance conditions, and (3) minimizing the disruption of the surrounding critical equipment already installed.

Conclusions
Since SASSI’s development and widespread adoption, enhanced solution algorithms have become available. SC-SASSI has incorporated these into the trusted SASSI framework to efficiently take advantage of modern high-performance computing (HPC). Leveraging SC-SASSI to fully utilize HPC can lead to dramatic project gains with reduced schedules, improved realism, and often more targeted, less conservative solutions.

Expanded SASSI capabilities via HPC functionality allow two primary advantages that lead to project gains: (1) large increases in permissible model sizes and (2) drastically reduced analysis run-time.  These two primary advantages allow direct and rigorous treatment of SSI phenomena that previously required gross simplification, compromise, sensitivity studies, and/or overly conservative assumptions.  More specifically, SASSI with HPC allows project improvements in areas such as (a) deep embedment with soft soil and high-frequency hazard, (b) structure-soil-structure interaction, (c) combined high-fidelity models for coupled stress analysis and seismic analysis, (d) probabilistic SSI analysis, (e) multiple configurations and/or alternate boundary conditions, (f) multiple hazard levels, (g) pile foundations, and (h) ground motion incoherency effects.

Project examples illustrated in this article demonstrate that the HPC capabilities in SC-SASSI allow treatment of complex SSI phenomena more rigorously and realistically than traditional SASSI approaches, while at the same time offering faster and more efficient analyses. When implemented to their maximum potential, HPC enhancements in SC-SASSI can lead to project gains by reducing cost, schedule, and risk.

References

  1. Lysmer, J., Tabatabaie, M., Tajirian, F.,  Vahdani, S., and Ostadan, F.  “SASSI – A system for analysis of soil-structure interaction”. Technical Report UCB/GT/81-02, Geotechnical Engineering, University of California, Berkeley, 1981.
  2. SC Solutions, Inc. “SC-SASSI Manual, Version 2.3.2”. Sunnyvale, California, 2018.
  3. Kosbab, B., Garcia, J., Li, W.,  Tran, H., Talebinejad, I., Bassam, A., and Tilow, K. “Soil-Structure Interaction: Project Gains through use of High-Performance Computing”. Transactions, SMiRT-24, Busan, Korea, 2017.

Get News & Views, Volume 54

News and Views, Volume 54 | Advanced NDE for Hydroelectric Penstock Inspection

By:  Jason Van Velsor and Jeff Milligan

At SI, we regularly combine advanced NDE inspections with fitness for service evaluations to provide value-added solutions for our clients.

Hydroelectric power plants harness two of the most powerful forces on earth, water and gravity.  The integrity of the penstocks that flow water to and away from the turbines in these plants is paramount to safe operation and the safety of the surrounding population. With many hydro plants approaching 100 years of service, critical issues can arise with these penstocks, which may have little to no fabrication documentation, may have significant fabrication imperfections, and may have significant accumulated damage from the environment and many years of service.

Our talented, highly experienced NDE staff can complete in-depth hydroelectric penstock inspections for our clients, providing peace of mind that their assets are safe to continue operating long into the future.

Example of Inspections Completed By SI

Figure 1. (Top) C-Scan image of corrosion spots on the ID of a penstock with the color scheme relative to material thickness; (Bottom) B-Scan image showing the thinnest thickness reading, 0.140 inch.

Phased Array Ultrasonic (PAUT) Corrosion Mapping of Penstocks

SI works with hydroelectric utility companies to provide detailed thickness measurements on specific areas of penstocks. Phased array ultrasonic corrosion mapping provides hundreds of thousands of thickness readings that can produce a detailed image of the inside surface of a penstock, which may have experienced corrosion or erosion that limits penstock life. This highly detailed scan produces the data required for accurate Fitness for Service (FFS) calculations. PAUT corrosion mapping can be performed from the outside diameter of penstocks that are above ground to detect internal wall thinning, or it can be performed from the inside of a penstock, as long as safe access and confined space requirements are met.  An example of the phased array ultrasonic data can be seen in Figure 1 Thickness measurement values, often taken every 0.04 inch (1 mm) along the scan area can be saved and exported using industry standard formats (e.g., CSV, excel, etc.) to support further statistical analysis of the ultrasonic data.

Corrosion Surface Profilometry

Figure 2. Laser scan image of corrosion on the OD of a penstock with pit depths identified.

For a pitted or corroded surface that is accessible to an inspector (ID or OD), the use of a laser profilometry device can be a valuable tool to map and depth size corrosion.  Conventional pit gauge measurement of corrosion on penstock surfaces can be a time consuming and inaccurate process.  The results rely heavily on the experience of the technician as well as the surrounding surface condition.  A more efficient and accurate method is to create an exact image of the surface using a handheld laser scanner.  The laser scanning process is very fast and the results can be displayed as a 3D surface or unrolled to a 2D view.  Reconstruction of the surface is real-time, with color coding used to provide a visual relevance for material loss.  Off-line analysis can be used to make discrete readings of wall loss, or the full map data file can be exported using standard file formats to allow other subsequent analysis to be conducted.

Short Range Guided Wave Technique to Inspect Riveted Joints for Crevice Corrosion

Figure 3. Drawing of potential location for crevice corrosion on a riveted lap-joint.

Figure 4. Mock-up drawing and actual examination data from SR-GWT test.

Some penstocks with riveted joints may suffer from crevice corrosion due to the construction geometry of the riveted lap joints.  The lap-joint area is generally covered in concrete and buried so the external surface is not easily accessible. The concrete can disbond over time and water collects and runs along the crevice of the plate and butt strap, causing corrosion. The area of crevice corrosion may not be assessed from the internal surface with traditional ultrasonic methods due to the obstruction from the internal butt strap, therefore SI has developed a short range guided wave testing (SR-GWT) technique to inspect for this crevice corrosion. Figure 3 shows an image to help visualize the issue.  For this technique electromagnetic acoustic transducers (EMAT) are utilized to propagate sound waves along the volume of the penstock plate to detect a change in the cross-sectional area.  Figure 4 shows an example of inspection data that was collected on a calibration plate to prove this technique.

Lap-Welded Longitudinal Seam Inspection

Our staff can complete lap-welded seam identification and inspections. Lap-welded or forge-weld longitudinal seam pipes and penstocks were manufactured in the 1920s (Figure 5). Oftentimes, little to no fabrication documentation exists that will tell a hydroelectric utility if their penstock cans were made with lap-welded seams. SI developed a phased array ultrasonic examination technique to identify areas of lap-welded seams and look for lack of fusion and service damage.

SI developed two different PAUT techniques to identify and examine lap-welded penstocks. A refracted shear wave technique is preferred for ID-connected indications, while a longitudinal wave technique produces sound that is more perpendicular to the weld bond line of the lap-welded joint.  Figure 6 shows PAUT scan data along with an explanation of typical features from three different lap-welded seam examinations.

ID/OD Girth Weld Inspection

Figure 5. Illustrated cross-section of a lap weld.

Phased array ultrasonic examination of girth welds is also a common inspection for hydro penstocks. SI’s vast experience inspecting high energy piping systems and pressure vessels translate perfectly to penstock girth weld applications. SI uses ultrasonic software simulation programs to create scan plans that calculate the necessary beam angles and focusing to ensure 100% weld coverage during a PAUT examination. Encoding PAUT data with an automated, semi-automated, or manual encoding device allows for off-line analysis and a permanent record of inspection data. SI also has the ability to create custom scanners, probes, and wedges, when required for difficult inspection applications.  The advanced NDE equipment and experience of SI is unmatched. 

Figure 6. PAUT scans at 0° incidence (image is analogous to a cross-section of the weld) from hammer-welded pipe showing seam indications (labelled “1”) increased wall thickness at the seam (labelled “2”), and relatively clean areas adjacent to the seam (labelled “3”). The top image and center images show indications from the bond line (likely indicating lack-of-fusion), while the bottom image shows no indications from the bond line. Note that the base material on the left and right ends of the image shows dense areas of small indications, likely attributable to numerous impurities and inclusions in low-quality skelp from which this pipe was manufactured.

SI Can Help

The situations discussed previously demonstrate solutions that SI has developed for hydroelectric penstocks. With our extensive expertise, SI can work with our clients to develop and execute inspection solutions that are customized to their specific needs and provide various engineering analyses based on the examination results.


Get News & Views, Volume 54

News & Views, Volume 54

The next issue of Structural Integrity’s bi-annual technical magazine, News and Views, is now available. In this issue, experts from our Nuclear, Energy Services, Nondestructive Examination (NDE), Pipeline Integrity Compliance Solutions, and Metallurgical Laboratory groups share project case studies and details on technical advancements across a range of industries and disciplines.

Get News & Views, Volume 54