News & Views, Volume 51 | Acoustic Emission Testing
STREAMLINING REQUALIFICATION OF HEAVY LIFT EQUIPMENT
By: Mike Battaglia and Jason Van Velsor
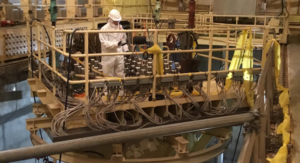
Figure 1. Heavy lift rig attached to reactor head in preparation for removal.
BACKGROUND
Proper control of heavy loads is critical in any industrial application as faulty equipment or practices can have severe consequences. The lifting technique, equipment, and operator qualifications must all meet or exceed applicable standards to ensure industrial safety. The significance of heavy lifts at commercial nuclear facilities is, perhaps, even greater. In addition to the consequences of an adverse event that are common to any industry (bodily injury or human fatality, equipment damage, etc.), the nuclear industry adds additional challenges. Such an adverse event in the nuclear industry can also affect (depending on the specific lift) fuel geometry / criticality, system shutdown capability, damage to safety systems, etc. One example of a critical lift in nuclear power facilities is the reactor vessel head / reactor internals lift.
The requirement to inspect the heavy lifting equipment for structural integrity is prescribed in NUREG-0612, Control of Heavy Loads At Nuclear Power Plants, as enforced by NRC Generic Letter 81-07. The aforementioned NUREG document describes specific requirements for special lifting devices. The requirements prescribed include:
- Special lifting devices are subject to 1.5X rates load followed by visual inspection, or
- Dimensional testing and non-destructive examination (NDE) of the load bearing welds
In the case of the former requirement, it can be difficult or even dangerous to test these lift rigs, which are designed to carry over 150 tons, at a factor of 1.5x. In the case of the latter requirement, employing the more traditional NDE techniques of MT, PT, and UT to inspect the lift rigs can be costly (both in terms of labor and radiological dose) and time consuming, in terms of impact to outage critical path, depending on when the inspection is performed. In PWRs or BWRs, inspections are performed in the reactor containment, or radiation-controlled area, and are typically only performed during the outage.
Ultimately, the NRC requires licensees to determine how they will comply with the NUREG requirements. One method that has been adopted (primarily by PWR plants) is Acoustic Emission (AE) testing. AE testing is a non-destructive testing process that uses high-frequency sensors to detect structure-borne sound emissions from the material or structure when under load. The process detects these acoustic emission events and, based on sensor locations and the known sound velocity and attenuation, can identify the approximate location of the sources or areas of concern. If such areas are identified, based on analysis of the data captured under load, those areas must be further investigated to characterize the indication. Such additional techniques may include surface examination (MT or PT), or volumetric UT to precisely locate, characterize, and size any indications.
Employing an advanced technique such as AE can significantly reduce the time required to perform this evolution, also reducing both the cost and dose associated with meeting the NUREG requirements.
The original deployment of this method was championed by a utility in the mid-1980’s and has since been adopted by many of PWR plants as the preferred inspection method.
APPLICATION OF AE TESTING
In 2021, SI began offering AE testing services for reactor head lift rigs, including the qualified personnel, equipment, and tooling necessary to perform this work. Our first implementation was at a nuclear plant in the Southeast US in the fall of 2021, and additional implementations are contracted in the spring and fall of 2022, and beyond.
There are several advantages to AE testing that make it uniquely suited for the vessel head (or internals) lift application. First, AE is a very sensitive technique, capable of picking up emissions from anomalies that cannot be detected by traditional techniques. This allows for identifying areas of potential / future concern before they are an imminent safety danger. Second, AE sensors are capable of sensing relevant emissions from a reasonable distance (up to 10 ft or more) between source emission and sensor placement. As such, AE testing can monitor the entire lifting structure with a reasonable number of sensors (typically less than 20) placed on the structure. Thus, sensors are strategically placed on the structure where failure is most likely – i.e., the mechanical or welded connections (joints) between structural members.
This strategic sensor placement has another inherent advantage unique to the AE process. If an indication is noted, the system has the capability to isolate the approximate source location (generally within a few inches) of the emission. This is accomplished using a calculation that considers the arrival time and intensity of the acoustic emission at multiple sensor locations. This is very beneficial when an indication requiring subsequent traditional NDE is noted as specific areas can be targeted, minimizing the scope of subsequent examinations.
The ability of AE testing to rapidly screen the entire lift structure for active damage growth saves time and money over the traditional load testing and comprehensive NDE approaches.
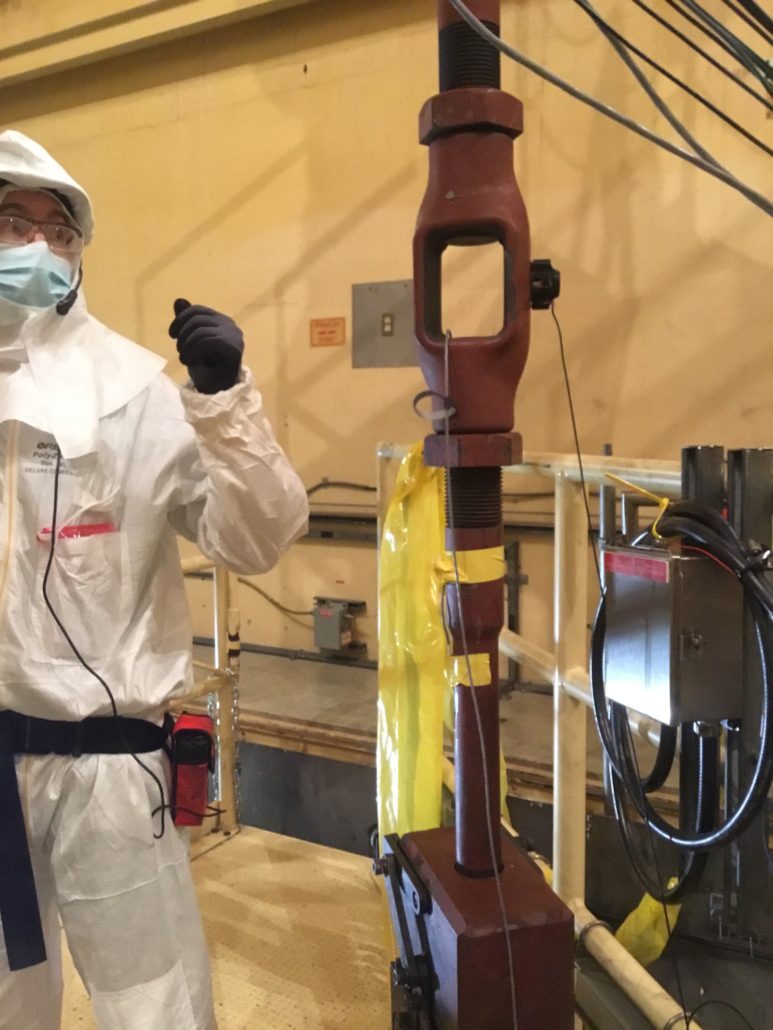
Figure 2. Lift rig turnbuckle outfitted with AE sensor.
Finally, and perhaps most importantly, the test duration is minimal and is, effectively, part of the standard process for reactor vessel head removal. Sensor placement is performed during the normal window of plant cooldown and vessel head de-tensioning, so outage critical path is not compromised. The actual test itself is performed as part of the head (or internals) lift; that is, when the head breaks from the vessel flange (and maximum load is achieved), the load is held in place for 10 minutes while monitoring for and recording acoustic emission activity. Each sensor (channel) is analyzed during the hold period and a determination is immediately made at the end of the 10-minute period as to whether the lifting rig structure is suitable for use. Unless evidence of an imminent failure is observed, the lift immediately proceeds to the head (or internals) stand. The gathered data are also analyzed on a graded basis. Depending on the energy intensity of the events detected at each sensor, subsequent recommendations may range from: ‘Good-as-is’, to ‘recommend follow-up NDE post-outage’.
The basic process of implementation is:
- Calibrate and test equipment offsite (factory acceptance testing)
- Mount sensors and parametric instrumentation (strain gauges, impactors) during plant cooldown and de-tensioning
- System check (Pencil Lead Breaks (PLBs), and impactor test)
- Lift head to the point of maximum load
- Hold for 10 minutes
- Continue lift to stand (unless evidence of imminent failure is observed)
- Final analysis / recommendations (off line, for post-outage consideration)
SI VALUE ADD
During our fall 2021 implementation, SI introduced several specific process improvements over what has been historically performed. These advances have enhanced the process from both a quality and schedule perspective. A few of these enhancements are:
COMMERCIAL GRADE DEDICATION OF THE SYSTEM
SI developed and deployed a commercial grade dedication process for the system and sensors. Often, licensees procure this work as safety-related, meaning the requirements of 10CFR50 Appendix B apply. The sensors and processing unit are commercially manufactured by a select few manufacturers that typically do not have QA programs that satisfy the requirements of 10CFR50, Appendix B. For this reason, SI developed a set of critical characteristics (sensor response, channel response to a simulated transient, etc.) and corresponding tests to validate that the system components are responding as-expected and can be adequately deployed in a safety-related application.
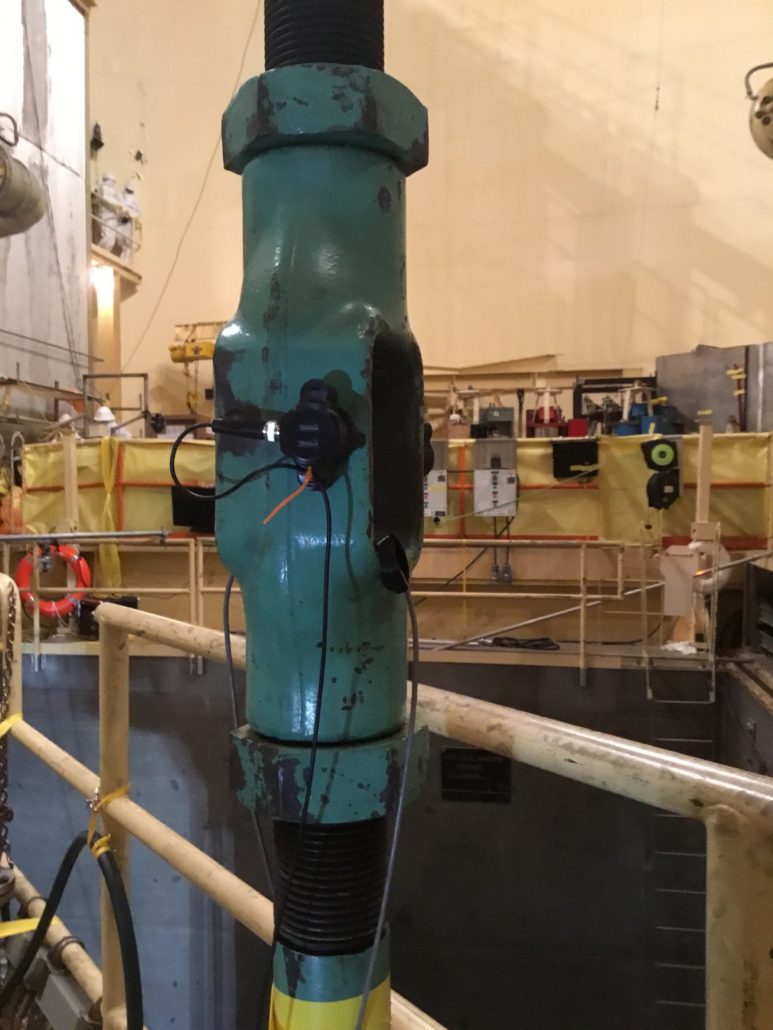
Figure 3. Close-up of AE sensor.
EMPLOYING STRAIN GAUGES FOR MAXIMUM LOAD
The arrival time of an acoustic emission at one of the installed sensors is measured in milliseconds. For this reason, it is critical to initiate the 10-minute hold period precisely when peak load is reached. The historical method for synchronizing peak-load with the start of the hold period relied on the use of a stop-watch and video feed of the readout from the containment polar crane load cell. When the load cell appears to max out, the time is noted and marked as the commencement of the test. This approach can be non-conservative from a post-test analysis perspective as the data before the noted start time is typically not considered in the analysis. As the strain gauge correlation provides a much more precise point of maximum load that is directly synchronized with the data acquisition instrument, it is more likely that early acoustic emissions, which are often the most intense and most relevant, are correctly considered in the analysis.
REMOTELY ACTUATED IMPACTORS
One of the methods used in AE testing to ensure that the sensors are properly coupled and connected is a spring-loaded center punch test. This test employs a center punch to strike the component surface, resulting in an intense sound wave that is picked up by all the sensors. However, this test has historically been performed manually and required someone to physically approach and touch the lifting equipment. In certain applications, this can be a safety or radiological dose issue and, additionally, can add time to an already time-critical plant operation. For this reason, SI has introduced the use of remotely actuated impactors to perform this function. The result is equivalent but entirely eliminates the need to have personnel on the lift equipment for the test as this task is performed remotely and safely from a parametric control center.
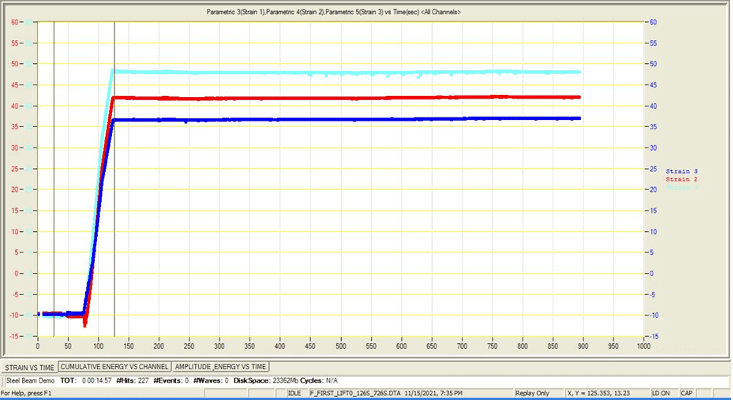
Figure 4. Strain gauge output showing precise timing of peak load on lift rig.
CONCLUSION
Employing cutting-edge AE testing for your vessel head / internals heavy lift can save outage critical path time, reduce radiological dose, and identify structural concerns early in the process. All of this leads to inherently safer, more efficient verification of heavy lift equipment.
SI has the tools, expertise, and technology to apply cutting-edge AE testing to your heavy lifts. SI is committed to continually improving the process at every implementation. Improvements in software processing time, and setup / preparation time are currently in-process. Finally, other potential applications for the method are also possible, and we stand ready to apply to the benefit of our clients.

